
The quarantine and social distancing guidelines for this pandemic have shifted many areas of life online. Many arts administrators, along with those in other career fields, are in their seventh month of working remotely and may be looking for ways to improve their experiences. This guide is meant to help improve the quality of experience for virtual work and social meetings through home studio technology, and to provide creators and hobbyists with information to get started with or improve their projects.
This article—focused on hardware—is the first in a two-part series meant to inform our readers about home studio technology. The two broad categories covered in this post are audio and video, along with a variety of subcategories. Although the products recommended may not fit everyone’s need, they are based on recommendations from others in the fields that primarily use the technologies.
AUDIO
Audio equipment ranges widely in function, price, and paired accessories. First, I will be touching on some terminology and comparisons, then I will make a few recommendations for entry-level devices.
Microphones
Microphones can fall into two broad categories: condenser and dynamic.
Condenser mics capture a very crisp and detailed sound, picking up higher highs and lower lows. Because they pick up sound so well, they are not going to be great for a noisy environment, but some of these downsides can be offset depending on the use case. For example, if the microphone is only being used for meetings and hangouts, most meeting software will have a noise threshold you can adjust to prevent your mic from playing when it picks up extraneous noises, such as from a fan or loud keyboard. These mics are also prone to clipping for very loud noises and require an external power supply.
Dynamic mics are generally very durable and are able to handle a higher volume without clipping. These mics tend to be very focused and pick up fewer background sounds or extra noises such as breathing.
Polar patterns are used to describe the space from which a microphone best picks up sound. Some microphones will have one polar pattern that supplements the intended use of the device, but other mics will have a selector for a few different patterns, making them a little more versatile. The most common patterns are cardioid, super cardioid, omnidirectional, and bidirectional. For the following graphics, the mic would be positioned within the center facing the 0-degree mark and the pattern would be a 3D bubble around the mic.
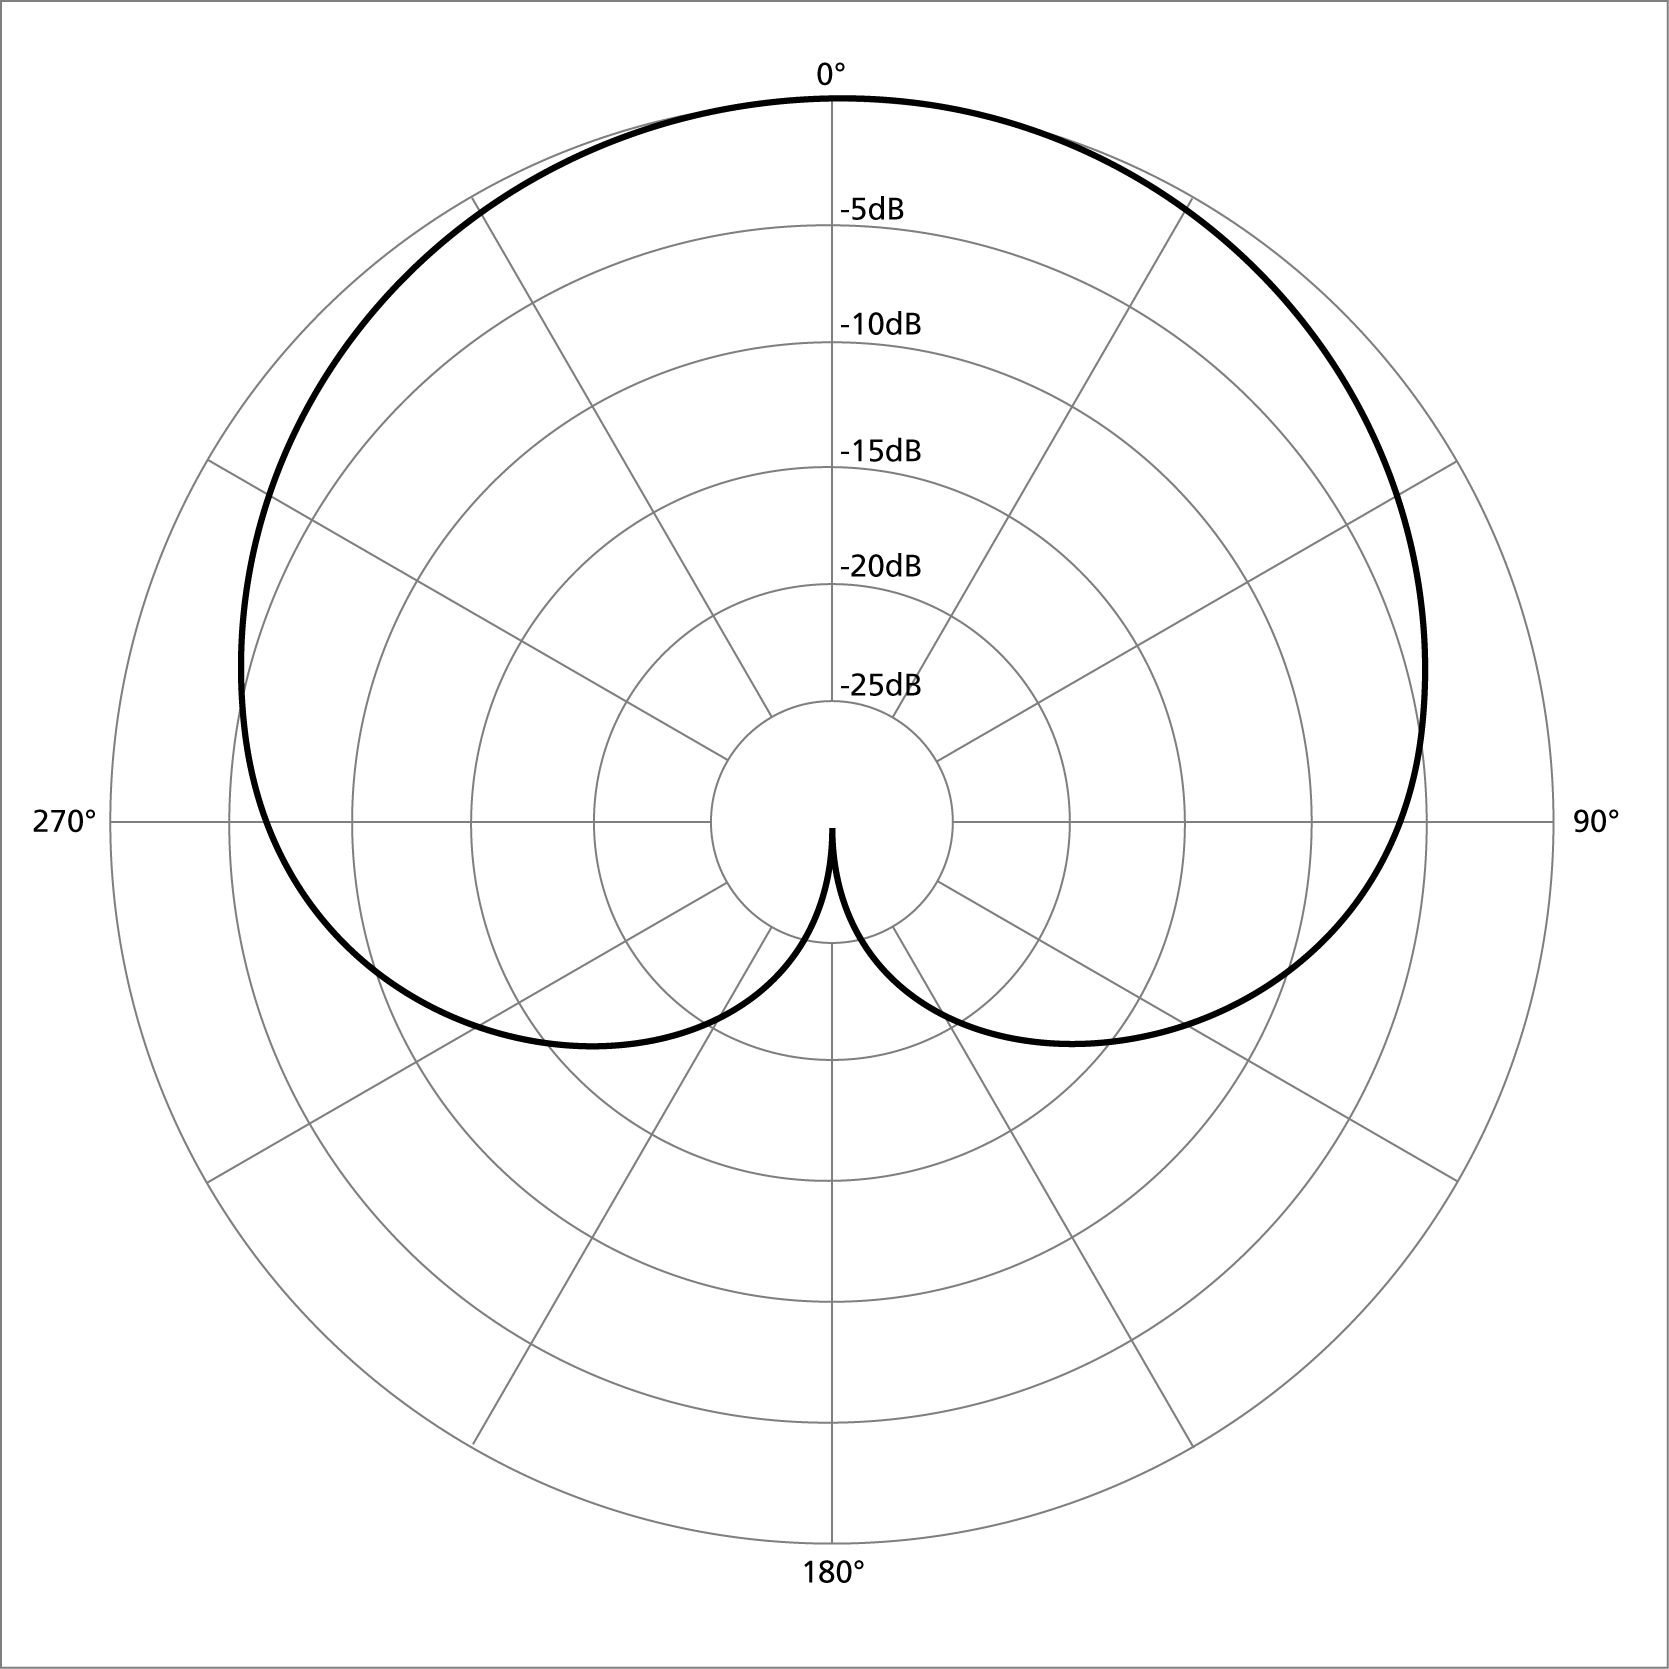
Cardioid patterns
have high sensitivity in front of the microphone and low sensitivity behind the microphone. This is great for recording a single sound source such as a speaker or singer.

Super cardioid patterns
are similar to the standard cardioid pattern, but have a tighter focus and pick up some sound from the rear.
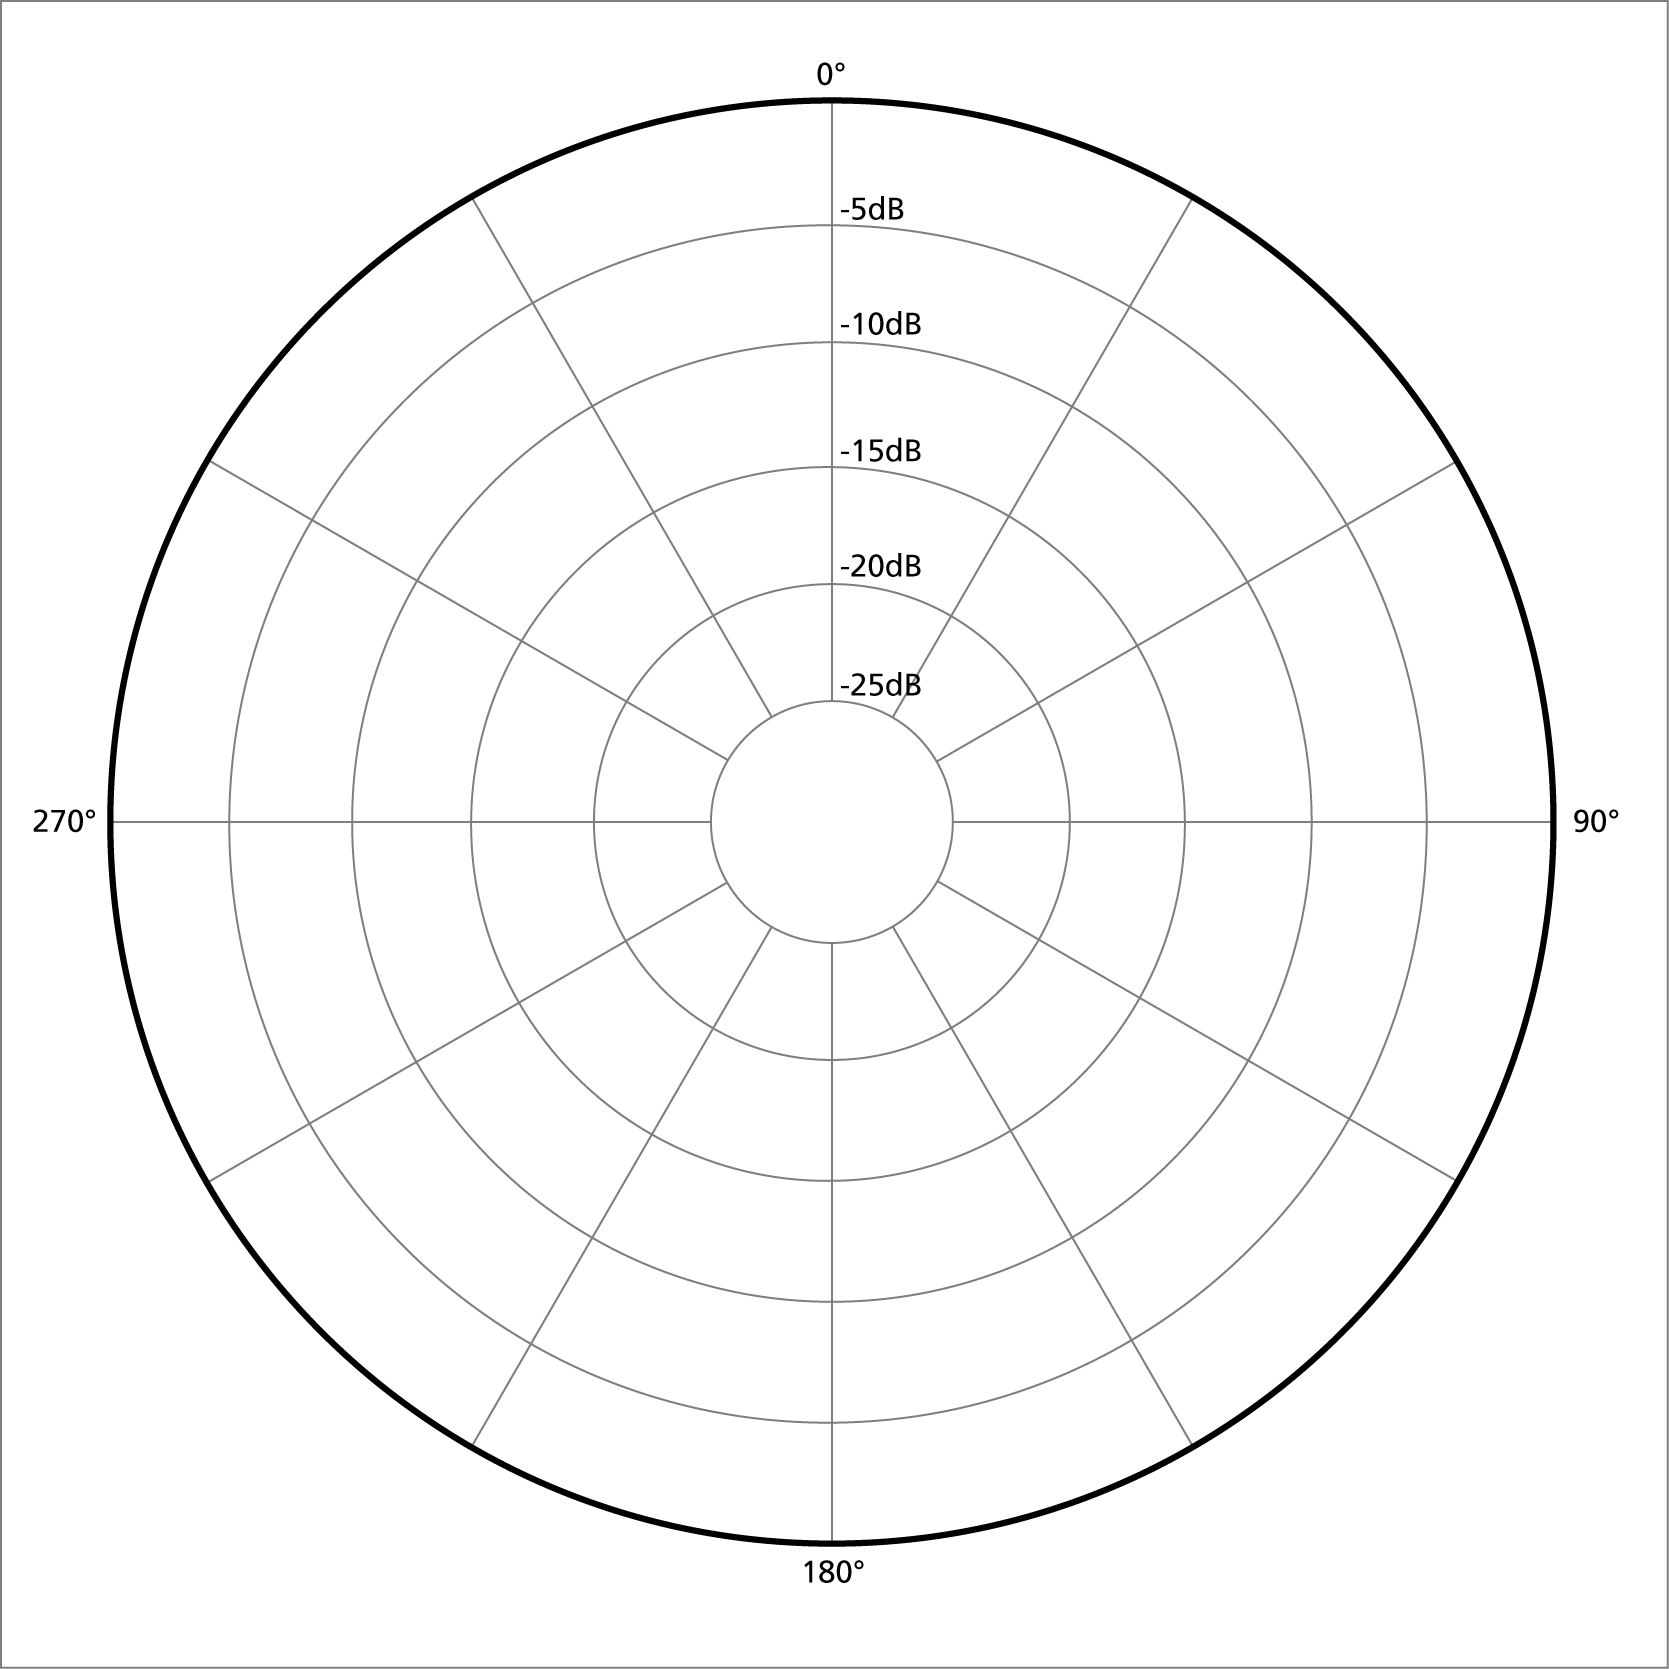
Omnidirectional patterns
will pick up sound equally from all directions, making them a good option for something like a round table discussion.

Bidirectional patterns
pick up sound equally from the front and back of the mic, which works well for something like a two person conversation.
A few other terms to make note of are XLR, phantom power, and side address or front address.
XLR microphones connect using a three-pronged cable, so you will likely need more hardware to properly use it, most commonly a mixer or interface.
Phantom power refers to mics that need an external power source, which can generally be provided by a mixer or interface but can also be provided by a stand alone power supply.
Side address or front address indicates which part of the microphone is considered the front for the polar patterns. A side address microphone should have an indication of which side is considered the front, and a front address microphone considers the top or end as the front. When using either type of mic, it is best if the audio source is projecting directly towards the front of the mic.
For beginners, microphone recommendations everywhere list the Blue Yeti, and it is without a doubt a high-quality entry level condenser microphone. There isn’t a dynamic mic as widely praised as the Blue Yeti for starters, but the Audio-Technica ATR2100x is also well regarded.
Interfaces and Mixers
Interfaces and mixers are additional pieces of hardware that can be used in conjunction with a microphone, instrument, or other audio source. There are a few overall differences between the two and some additional features to be aware of that are very important to some use cases.
Interfaces are generally simple converters that convert an analog signal to a digital one that a computer can understand. They usually come with simple features and controls such as a gain control, a line out and line out volume control, and phantom power.
Mixers, or sound boards, are generally more robust pieces of equipment that take multiple signals and apply volume controls and effects before sending them back out. They can be used for both live performances and digital recordings, but not all of them do both. Some mixers will have a built-in audio interface that allows them to be directly recorded by a computer, but others will require you to purchase one if that is your use case.
When trying to record on either device, it is important to know what the limitations are. Most cheaper devices will only output all of the sound as one track, which is fine if you are only interested in doing things along the lines of recording or broadcasting a single mic. But if you wanted to do an in-person podcast with multiple people and different individual mics and you are in a less-than-ideal environment, then you would need a device capable of recording multiple tracks. Multi-track recording is also important when recording multiple instruments at once if you want to individually adjust sounds and effects digitally.
Headphones and Speakers
Headphones and speakers are more broad, but are important to understand when setting up your audio.
When using speakers with a microphone, you will want to be very aware of feedback. There are software solutions to assist with that (which will be covered in part two of this series), but proper placement will help a lot regardless. First, be aware of the microphone’s polar pattern and try to place speakers as far away as possible. Second, you need to be aware of the speakers’ volume levels, the applications playing through them, and what the mic picks up. Generally, a dynamic mic is the better choice if you want to have a set up that includes speakers while using a mic.
Using headphones will generally reduce the chance of receiving feedback, but some open headphones may have a bit of sound leakage to be aware of when trying to record or broadcast audio. Closed headphones are great for reducing the chance of feedback and for monitoring or listening back to a recording, but they do also make it hard to hear background noise that may need to be monitored, like kids or pets. Closed headphones also can be uncomfortable for people with glasses, so it is worth taking a look at reviews for a product with that in mind.
Some additional things to be aware of are sound quality, amp requirements, and audio jacks. Sound quality can vary greatly in headphones and higher quality ones will pick up irritating noises some speakers or headphones will miss. It is important to keep that in mind when editing or broadcasting so as not to alienate a portion of the audience you might otherwise have captured. Headphone amps are low power devices that increase the voltage from a source in order to power speakers. They can dramatically improve the performance of some headphones. Audio connectors come in a few different sizes: 6.35, 4.4, 3.5, and 2.5. Converters are available at relatively low prices and the standard size for most consumer-level products is 3.5, while most home and studio equipment use a 6.35.
Other audio Accessories
A few other accessories that are helpful to be aware of when creating a higher quality audio set up are pop filters, mic stands, and shock mounts.
Pop filters and wind screens serve two primary purposes: extending microphone lifetime and reducing plosives. Saliva has corrosive elements, and a pop filter or wind screen will help reduce the buildup on the inside of the microphone, helping to extend the lifetime of the device. Plosives are sounds that have high energy behind them, like “p” sounds, and the filter serves to dampen the energy that would otherwise cause a distortion in the mic and its outgoing sound.
Microphone stands and boom arms come in a few varieties including desk mounted, wall mounted, and free standing. When using a microphone, it is best to get it away from any surface that tends to have a lot of vibrations. For example, a microphone on a desk stand is going to rumble and pick up a lot of noise if it is next to a mechanical keyboard. Desk mounted arms will attach to a side of a desk, but require some flat space in order to do so, so be careful about using them if the desk has a lip or bar near the edge. A mic stand is like a tripod and can be placed on the floor or a flat surface and can be easily moved. Floor stands are generally best if there is space. A wall mounted boom is an alternative for keeping a mic out of the way if floor space is limited.
Shock mounts can help reduce the noise a mic picks up due to vibrations, but be careful when selecting one because they are rarely one-size-fits-all for microphones. They will generally fit a microphone stand or come with equipment needed to fit to a standard stand or boom.
Sound Dampening
If a room is empty or echoing, it can be a major detriment to recording or broadcast. This can be counteracted by getting foam sound dampening panels or curtains. Panels can be mounted along walls or purchased as free-standing partitions. If you are purchasing a limited amount, a good rule of thumb is to install them at sitting or standing heights.
Video
Video equipment covers an even broader scope than audio equipment and also has a wide range in price for quality and purpose. Here is an overview of relevant products and devices.
Cameras
The primary options for cameras are webcams, digital cameras, and phone cameras. Some of this hardware may require third party software or additional hardware, but can produce great results.
Webcams are good for simple video calls and livestreams and can cost up to $300 for a higher quality version. There are wireless options as well as long-cabled versions to set up multiple views.
Digital Cameras like DSLR or mirrorless digital cameras have exceptional quality and can be used both for their original purposes and as webcams. There are a couple of options when it comes to setting these up and will normally require additional software or hardware.
When connected through a USB, these cameras may have software that is recognized as a video feed and can be used to create a virtual webcam, which allows it to be picked up by most video conferencing software. There are free options available and many manufacturers will have an option available on their site for a particular camera brand.
HDMI outputs on cameras will give the option of feeding the video at a generally higher quality through a capture device for the computer to pick up. Some of these capture devices will again need third party software to be compatible with a video conference.
Both types of video streams can be easily recorded or broadcasted by software designed for those purposes—such as through XSplit or OBS for broadcasting a livestream.
Phone cameras have some interesting potentials, but they usually need software solutions. Some phones are able to cast directly to a PC where software can be used to convert it to a virtual webcam stream. Using free apps, a phone camera can also stream to a dedicated IP, which can be received and played on any device that can also be picked up and converted by software like XSplit. With the ability to stream directly to an IP, multiple cameras and view points can be set up and switched between for live streamed or recorded content. These software solutions will be covered in more depth in part two of this series.
One of the hardware solutions available for phone cameras is using a castable device and capture device. This setup has the potential to be the most complicated and can have a lot of failure points, but it does allow for the reuse of hardware for interesting purposes. First, you will need a device capable of being casted, like a Chromecast, and a device capable of capturing the casted device’s output. Most of these casting devices that use HDMI will also have HDMI protection enabled. This means there will need to be a middle device that removes it if the capture device does not have the ability to read it. Some HDMI splitters will strip the HDMI protection and allow the capture device to receive the signal and send it to the computer. Once on the computer, the video stream can be converted to a virtual webcam or used for recording and broadcasting.
Standalone IP cameras also exist for security but can be repurposed much the same way phones can. They may also require software solutions if they don’t stream to a particular format accepted by a conferencing software. Having no personal experience with them, I caution against anyone trying to repurpose them without a bit of technical experience.
Camera recommendations are something I have less experience with, but for live streaming and video calls, the Logitech c922 HD Pro has been the gold standard of price for performance.
Capture Devices
Capture devices are useful for taking a video stream and using it on a computer and are primarily one of two types: internal or external.
Internal capture cards require installation onto the motherboard of a computer. This means that a computer will have to have a free compatible slot and enough room in the case. Working inside a computer can be daunting to some people, but there are a lot of installation tutorials available online that also cover good practices when working in a computer. I highly recommend doing additional research if you are not comfortable working in your computer and would like to go this route.
External capture devices have largely become the go to for capture devices. Most of these devices are thunderbolt or USB compatible, but there are some cases where a device may not work on all platforms. I recommend double checking the required specifications before purchasing one of these devices. The USB devices may also require a USB 3.0 or later port to make full use of the quality available. Generally, these ports are colored blue on a computer.
Lights
Lighting is important when capturing video. If your use case is beyond just video calls, then it would be worthwhile to look into lighting kits. It is important to note that most of these lights start to get very warm and, depending on the solution, can take a large amount of space.
Smaller lights can be mounted on a desk of monitor. Many of these are fine for use with a static camera meant to capture a person, but will start struggling with larger spaces or with green screens.
Larger free standing lights are recommended if you want to record in a poorly lit project space or make use of a green screen. This is to ensure that the green screen is evenly lit and picked up by the software doing the chroma keying.
Green Screens
Green screens can be used for a number of purposes and generally aren’t too expensive or space consuming when not in use, although more permanent setups are available if you have dedicated space. One use for them on a common consumer level is to provide a multi-functional barrier between the camera and the rest of the room which can be especially useful if the environment is unpredictable. Other uses are for live streaming games with a camera overlay: the green screen can be keyed out, reducing the ambient occlusion of the video. Another use is to spice up what would otherwise be a boring background when recording videos.
Closing
There are constant innovations in technology, and within the current climate, I would expect these technologies in particular to receive more attention. There are a lot more tools to cover, but with this knowledge, you can begin to make more informed tech purchase decisions to help with your online meetings or creative projects. The next article, going over software tools, will cover some options for utilizing your new technologies to their fullest potential.
Read part two of this series about home studio software solutions here.